In this post we will see the various steps required to configure the environment for SharePoint 2013 apps.
For viewing the SharePoint app store, select Add an app link and click on SharePoint Store to view all available apps.

If the app environment is not configure, then you might run into an error stating that "Apps are turned off" as shown in the following figure.

Following are the steps to configure the environment for SharePoint 2013 apps:
1) Create a forward lookup zone for apps
2) Link the App Domain to the SharePoint Server
3) Start the required Services
4) Create the Subscription Settings and App Management Service Applications
5) Configure the App URL’s in SharePoint
6) Test the App environment
Now lets see each of the above mentioned steps in detail.
1. Create a forward lookup zone for apps
SharePoint 2013 Apps have their own, isolated URLs, which are separate from the URLs of the sites where the app is being deployed to and where the app is being used. In order to provide isolation apps should run in their own domain, instead of in the same domain name as your farm. Using a different domain name for apps helps prevent cross-site scripting between apps and SharePoint sites.
Microsoft recommends that the new domain name should NOT be a subdomain of the domain that hosts the SharePoint Sites. For example, if the SharePoint sites are at home.com, consider homeapps.com instead of app.home.com as the domain name.
Verify that the user account that performs this procedure is a local administrator on the domain controller.
Click Start, point to Administrative Tools, and then click DNS.

In DNS Manager, right-click Forward Lookup Zones, and then click New Zone….

In the New Zone Wizard, click Next.

In the Zone Type page, accept the default of Primary zone, and then click Next.

In the Active Directory Zone Replication Scope page, select the appropriate replication method for your environment (the default is to all DNS servers in this domain), and then click Next.

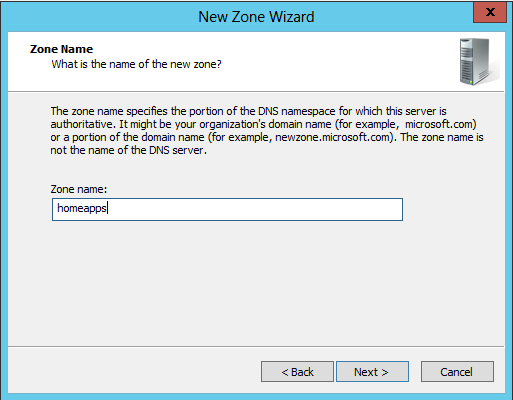
In the Zone Name page, in the Zone name box type the name for your new app domain name (for example, homeapps.com), and then click Next.

On the Dynamic Update page, select the appropriate type of dynamic updates for your environment (the default is Do not allow dynamic updates), and then click Next.

On the Completing the New Zone Wizard page, review the settings, and then click Finish.

Note: If you plan to use apps on an internet-facing website, you have to buy this domain name. Even if you only use it internally, it’s always better to buy it before someone else buys it and registers it in the public DNS.
2. Link the App Domain to the SharePoint Server
We now need to instruct our DNS to forward all the requests from homeapps.com to the SharePoint Server hosting the apps
Verify you are logged in as a Domain Admin
In DNS Manager, under Forward Lookup Zones, right-click the new app domain name, and then click New Alias (CNAME).

In the New Resource Record dialog box, in the Alias name (uses parent domain if left blank) box, type *.

Next to the Fully qualified domain name (FQDN) for target host box, click Browse and navigate to the Forward Lookup Zone for the domain that hosts the SharePoint sites and then navigate to the record that points to the server that hosts the SharePoint site.
Click OK.
Verify the new domain name
This is just a little step to make sure everything we did until now is right.
Click Start, and then click Command Prompt. At the command prompt, type ping followed by a subdomain of the domain that you created, and then press ENTER. (EX: ping test.homeapps.com) where "test" is a random word and homeapps.com is your newly created domain.

If the ping command returns the correct IP address, then your wildcard for the domain name was configured successfully.
3. Start the required services
Apps rely on the App Management and Microsoft SharePoint Foundation Subscription Settings service applications. These service applications use the multi-tenancy features to provide app permissions and create the subdomains for apps. Therefore, even if you are not hosting multiple tenants, you must still establish a name for the default tenant for your environment (any SharePoint site that is not associated with a tenant will be in the default tenant). In this step we will start the two required services!
Verify that you are a member of the farm administrators group in Central Administration.
In SharePoint 2013 Central Administration, click System Settings.
On the System Settings page, under Servers, click Manage services on server.
On the Services on Server page, next to App Management Service, click Start.
On the Services on Server page, next to Microsoft SharePoint Foundation Subscription Settings Service, click Start.

Verify that the App Management and Microsoft SharePoint Foundation Subscription Settings services are running.
4. Create the Subscription Settings and App Management Service Applications
In this step we will create the two Service Applications we talked about in the previous step. As you know, Microsoft is strongly promoting PowerShell to the SharePoint Administrators, and to make sure you start using it, they made it the only way to configure the Subscription Settings Service Application. Since we will be doing PowerShell for the first one, we will both in PowerShell.
Verify that you have the following memberships:
securityadmin fixed server role on the SQL Server instance.
db_owner fixed database role on all databases that are to be updated.
Administrators group on the server on which you are running the Windows PowerShell cmdlets.
i) Create a new App Management Service Application from central admin.


ii) There is no interface provided by SharePoint for creating Subscription Settings service application. Therefore we will use PowerShell script to create it as follows.
Open SharePoint 2013 Management Shell as an Administrator and run the scripts.
$subscriptionSettingsServiceApplicationName = 'Subscription Settings Service Application'
$pool = Get-SPServiceApplicationPool 'SharePoint Web Services Default'
$subscriptionSettingsServiceDB= 'Sharepoint_SiteSubscriptionSettingsServiceDB'
$subscriptionSettingsServiceApplication = New-SPSubscriptionSettingsServiceApplication -ApplicationPool $pool -Name $subscriptionSettingsServiceApplicationName -DatabaseName $subscriptionSettingsServiceDB
$subscriptionSettingsServicApplicationProxy = New-SPSubscriptionSettingsServiceApplicationProxy -ServiceApplication $subscriptionSettingsServiceApplication

5. Configure app URLs
In Central Administration, click Apps. On the Apps page, click Configure App URLs.

In the App domain box, type the isolated domain that you created for hosting apps.
In the App prefix box, type a name to use for the URL prefix for apps.

Click OK.
Here is how your URL will look like depending on the settings.

6) Test the App environment
In order to test the environment go to the site and select Add an app link and click on SharePoint Store to view all available apps. The list of all available apps will be displayed as follows:

Click on any of the apps that you wish to add to your site and click on ADD IT button.

The app will display the following popup requesting for permission. Click on Trust it button to grant permission.

In site content page you will that the app has been added to the site.

Click on the app to view further details. You can add the app to any of the pages using an app part about which we will discuss in the upcoming blogs.

Now the environment is completely ready for use and apps can be downloaded and added to the SharePoint site.
Hope you like this post!
For viewing the SharePoint app store, select Add an app link and click on SharePoint Store to view all available apps.


Following are the steps to configure the environment for SharePoint 2013 apps:
1) Create a forward lookup zone for apps
2) Link the App Domain to the SharePoint Server
3) Start the required Services
4) Create the Subscription Settings and App Management Service Applications
5) Configure the App URL’s in SharePoint
6) Test the App environment
Now lets see each of the above mentioned steps in detail.
1. Create a forward lookup zone for apps
SharePoint 2013 Apps have their own, isolated URLs, which are separate from the URLs of the sites where the app is being deployed to and where the app is being used. In order to provide isolation apps should run in their own domain, instead of in the same domain name as your farm. Using a different domain name for apps helps prevent cross-site scripting between apps and SharePoint sites.
Microsoft recommends that the new domain name should NOT be a subdomain of the domain that hosts the SharePoint Sites. For example, if the SharePoint sites are at home.com, consider homeapps.com instead of app.home.com as the domain name.
Verify that the user account that performs this procedure is a local administrator on the domain controller.
Click Start, point to Administrative Tools, and then click DNS.

In DNS Manager, right-click Forward Lookup Zones, and then click New Zone….

In the New Zone Wizard, click Next.

In the Zone Type page, accept the default of Primary zone, and then click Next.

In the Active Directory Zone Replication Scope page, select the appropriate replication method for your environment (the default is to all DNS servers in this domain), and then click Next.

In the Zone Name page, in the Zone name box type the name for your new app domain name (for example, homeapps.com), and then click Next.
On the Dynamic Update page, select the appropriate type of dynamic updates for your environment (the default is Do not allow dynamic updates), and then click Next.

On the Completing the New Zone Wizard page, review the settings, and then click Finish.

Note: If you plan to use apps on an internet-facing website, you have to buy this domain name. Even if you only use it internally, it’s always better to buy it before someone else buys it and registers it in the public DNS.
2. Link the App Domain to the SharePoint Server
We now need to instruct our DNS to forward all the requests from homeapps.com to the SharePoint Server hosting the apps
Verify you are logged in as a Domain Admin
In DNS Manager, under Forward Lookup Zones, right-click the new app domain name, and then click New Alias (CNAME).

In the New Resource Record dialog box, in the Alias name (uses parent domain if left blank) box, type *.

Next to the Fully qualified domain name (FQDN) for target host box, click Browse and navigate to the Forward Lookup Zone for the domain that hosts the SharePoint sites and then navigate to the record that points to the server that hosts the SharePoint site.
Click OK.
Verify the new domain name
This is just a little step to make sure everything we did until now is right.
Click Start, and then click Command Prompt. At the command prompt, type ping followed by a subdomain of the domain that you created, and then press ENTER. (EX: ping test.homeapps.com) where "test" is a random word and homeapps.com is your newly created domain.

If the ping command returns the correct IP address, then your wildcard for the domain name was configured successfully.
3. Start the required services
Apps rely on the App Management and Microsoft SharePoint Foundation Subscription Settings service applications. These service applications use the multi-tenancy features to provide app permissions and create the subdomains for apps. Therefore, even if you are not hosting multiple tenants, you must still establish a name for the default tenant for your environment (any SharePoint site that is not associated with a tenant will be in the default tenant). In this step we will start the two required services!
Verify that you are a member of the farm administrators group in Central Administration.
In SharePoint 2013 Central Administration, click System Settings.
On the System Settings page, under Servers, click Manage services on server.
On the Services on Server page, next to App Management Service, click Start.
On the Services on Server page, next to Microsoft SharePoint Foundation Subscription Settings Service, click Start.

Verify that the App Management and Microsoft SharePoint Foundation Subscription Settings services are running.
4. Create the Subscription Settings and App Management Service Applications
In this step we will create the two Service Applications we talked about in the previous step. As you know, Microsoft is strongly promoting PowerShell to the SharePoint Administrators, and to make sure you start using it, they made it the only way to configure the Subscription Settings Service Application. Since we will be doing PowerShell for the first one, we will both in PowerShell.
Verify that you have the following memberships:
securityadmin fixed server role on the SQL Server instance.
db_owner fixed database role on all databases that are to be updated.
Administrators group on the server on which you are running the Windows PowerShell cmdlets.
i) Create a new App Management Service Application from central admin.


ii) There is no interface provided by SharePoint for creating Subscription Settings service application. Therefore we will use PowerShell script to create it as follows.
Open SharePoint 2013 Management Shell as an Administrator and run the scripts.
$subscriptionSettingsServiceApplicationName = 'Subscription Settings Service Application'
$pool = Get-SPServiceApplicationPool 'SharePoint Web Services Default'
$subscriptionSettingsServiceDB= 'Sharepoint_SiteSubscriptionSettingsServiceDB'
$subscriptionSettingsServiceApplication = New-SPSubscriptionSettingsServiceApplication -ApplicationPool $pool -Name $subscriptionSettingsServiceApplicationName -DatabaseName $subscriptionSettingsServiceDB
$subscriptionSettingsServicApplicationProxy = New-SPSubscriptionSettingsServiceApplicationProxy -ServiceApplication $subscriptionSettingsServiceApplication

5. Configure app URLs
In Central Administration, click Apps. On the Apps page, click Configure App URLs.

In the App domain box, type the isolated domain that you created for hosting apps.
In the App prefix box, type a name to use for the URL prefix for apps.

Click OK.
Here is how your URL will look like depending on the settings.

6) Test the App environment
In order to test the environment go to the site and select Add an app link and click on SharePoint Store to view all available apps. The list of all available apps will be displayed as follows:

Click on any of the apps that you wish to add to your site and click on ADD IT button.

The app will display the following popup requesting for permission. Click on Trust it button to grant permission.

In site content page you will that the app has been added to the site.

Click on the app to view further details. You can add the app to any of the pages using an app part about which we will discuss in the upcoming blogs.

Now the environment is completely ready for use and apps can be downloaded and added to the SharePoint site.
Hope you like this post!
Hello sir,
ReplyDeleteMe getting error while executing the below script: "$pool = Get-SPServiceApplicationPool 'SharePoint Web Services Default' "
The Error is as follows: Get-SPServiceApplicationPool : object not found