Overview
In the previous post I had highlighted on how to create and deploy a SharePoint 2013 feature using visual studio 2012. Usually for development environments, this is the usual practice so that the developer can easily deploy solutions and test\debug it.
But, what if you want to deploy the feature to another server? In this case you might need to provide an installer or deployable solution that deploys all the supporting files to the respective places and also installs and activates the feature.
In SharePoint 2013 we can use solution packages for this purpose and deploy it using STSADM.EXE command which resides in 15 Hive at: C:\Program Files\Common Files\Microsoft Shared\Web Server Extensions\15\BIN\STSADM.EXE
Solution Package
A Solution Package is a cabinet file (.cab compressed file) with an extension of .WSP—which stands for Windows SharePoint Services Solution Package, provided to automate the process of installing features and customizations.
Through a .WSP package, you can deploy a set of one or more features, automatically copying the files and folders to every front-end server from a centralized management console.
A .wsp contains a solution-specific manifest file, called solution manifest, which is yet another XML file that defines a set of information through some attributes and some child elements.
Creating a solution Package
Create a feature using the steps mentioned in the previous post (SharePoint 2013 - Developing a feature using visual studio 2012). Instead of deploying directly to the site we will create a solution package and use STSADM.EXE to deploy it.
Steps for creating a solution package
Following are the steps for creating a solution package for this feature:
1) Open the project in visual studio 2012. Go the Package folder and open Package.package file. You can see the package name and view/add/remove its contents in the designer view.

2) Click on the Manifest tab and you can see the contents of solution package in XML format which mainly consist of the Assembly location and the Manifest location as shown in the figure below.

3) Now select Build->Publish option in VS 2012. Choose a suitable target location for publishing the solution package.

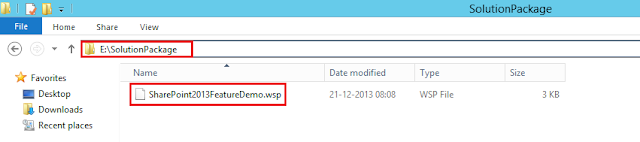
4) The solution package (.wsp file ) will be published at the specified location.
Solution Deployment and Feature activation using STSADM
Move the WSP file to a convenient location in the file system (E\WSP in my case). Run command prompt as administrator and change directory to 15Hive/bin folder as follows: cd C:\Program Files\Common Files\Microsoft Shared\Web Server Extensions\15\BIN\
Steps for deploying the feature
Following are the steps for deploying the feature:
1) Adding the wsp solution
STSADM.EXE -o addsolution -filename E:\SolutionPackage\SharePoint2013FeatureDemo.wsp

2) Deploying the solution
STSADM.EXE -o deploysolution -name SharePoint2013FeatureDemo.wsp -immediate -allowGacDeployment -force

3) Execute Time Job
stsadm -o execadmsvcjobs

4) Installing the feature
STSADM.EXE -o installfeature -name SharePoint2013FeatureDemo_Feature1 -force

5) Activating the feature
STSADM.EXE -o activatefeature -name SharePoint2013FeatureDemo_Feature1 -url http://sp2013home:10001/ -force

6) Custom page deployed
Once the feature is activated you can visit the newly deployed page as shown in the figure below.

Feature De-activation and Solution Retractions using STSADM
1) De-activating the feature
STSADM.EXE -o deactivatefeature -name SharePoint2013FeatureDemo_Feature1 -url http://sp2013home:10001/ -force

2) Un-installing the feature
STSADM.EXE -o uninstallfeature -name SharePoint2013FeatureDemo_Feature1 -force

3) Retracting the solution
STSADM.EXE -o retractsolution -name SharePoint2013FeatureDemo.wsp -immediate

4) Execute Time Job
stsadm -o execadmsvcjobs

5) Deleting the solution
STSADM.EXE -o deletesolution -name SharePoint2013FeatureDemo.wsp -override

6) Custom Page Removed
Once the feature is de-activated, you will no longer be able to view the custom page deployed along with the feature.

Hope this post was helpful to you!
In the previous post I had highlighted on how to create and deploy a SharePoint 2013 feature using visual studio 2012. Usually for development environments, this is the usual practice so that the developer can easily deploy solutions and test\debug it.
But, what if you want to deploy the feature to another server? In this case you might need to provide an installer or deployable solution that deploys all the supporting files to the respective places and also installs and activates the feature.
In SharePoint 2013 we can use solution packages for this purpose and deploy it using STSADM.EXE command which resides in 15 Hive at: C:\Program Files\Common Files\Microsoft Shared\Web Server Extensions\15\BIN\STSADM.EXE
Solution Package
A Solution Package is a cabinet file (.cab compressed file) with an extension of .WSP—which stands for Windows SharePoint Services Solution Package, provided to automate the process of installing features and customizations.
Through a .WSP package, you can deploy a set of one or more features, automatically copying the files and folders to every front-end server from a centralized management console.
A .wsp contains a solution-specific manifest file, called solution manifest, which is yet another XML file that defines a set of information through some attributes and some child elements.
Creating a solution Package
Create a feature using the steps mentioned in the previous post (SharePoint 2013 - Developing a feature using visual studio 2012). Instead of deploying directly to the site we will create a solution package and use STSADM.EXE to deploy it.
Steps for creating a solution package
Following are the steps for creating a solution package for this feature:
1) Open the project in visual studio 2012. Go the Package folder and open Package.package file. You can see the package name and view/add/remove its contents in the designer view.

2) Click on the Manifest tab and you can see the contents of solution package in XML format which mainly consist of the Assembly location and the Manifest location as shown in the figure below.

3) Now select Build->Publish option in VS 2012. Choose a suitable target location for publishing the solution package.

4) The solution package (.wsp file ) will be published at the specified location.

Solution Deployment and Feature activation using STSADM
Move the WSP file to a convenient location in the file system (E\WSP in my case). Run command prompt as administrator and change directory to 15Hive/bin folder as follows: cd C:\Program Files\Common Files\Microsoft Shared\Web Server Extensions\15\BIN\
Steps for deploying the feature
Following are the steps for deploying the feature:
1) Adding the wsp solution
STSADM.EXE -o addsolution -filename E:\SolutionPackage\SharePoint2013FeatureDemo.wsp

2) Deploying the solution
STSADM.EXE -o deploysolution -name SharePoint2013FeatureDemo.wsp -immediate -allowGacDeployment -force

3) Execute Time Job
stsadm -o execadmsvcjobs

4) Installing the feature
STSADM.EXE -o installfeature -name SharePoint2013FeatureDemo_Feature1 -force

5) Activating the feature
STSADM.EXE -o activatefeature -name SharePoint2013FeatureDemo_Feature1 -url http://sp2013home:10001/ -force

6) Custom page deployed
Once the feature is activated you can visit the newly deployed page as shown in the figure below.

Feature De-activation and Solution Retractions using STSADM
1) De-activating the feature
STSADM.EXE -o deactivatefeature -name SharePoint2013FeatureDemo_Feature1 -url http://sp2013home:10001/ -force

2) Un-installing the feature
STSADM.EXE -o uninstallfeature -name SharePoint2013FeatureDemo_Feature1 -force

3) Retracting the solution
STSADM.EXE -o retractsolution -name SharePoint2013FeatureDemo.wsp -immediate

4) Execute Time Job
stsadm -o execadmsvcjobs

5) Deleting the solution
STSADM.EXE -o deletesolution -name SharePoint2013FeatureDemo.wsp -override

6) Custom Page Removed
Once the feature is de-activated, you will no longer be able to view the custom page deployed along with the feature.

Hope this post was helpful to you!
Hi Mukundan,
ReplyDeleteYours articles are very good.But i have one doubt.How can i add my own page(.aspx) as a link under site administration in site settings page.Please help me in that
Hi Mukundan,
ReplyDeleteYours articles are very good.But i have one doubt.How can i add my own page(.aspx) as a link under site administration in site settings page.Please help me in that