In this post we will see the various steps required to create and configure My Sites in SharePoint 2013.
Steps for creating and configuring My Sites
1) Create new WebApplication
2) Create My Sites Host site collection
3) Add new Managed Path for personal sites
4) Enable Self-Service Site Creation
5) Configure User Profile Service Application
6) Setup My Sites
7) Create My Sites
Now lets see each of the steps in detail in order to successfully configure and use SharePoint 2013 My Sites.
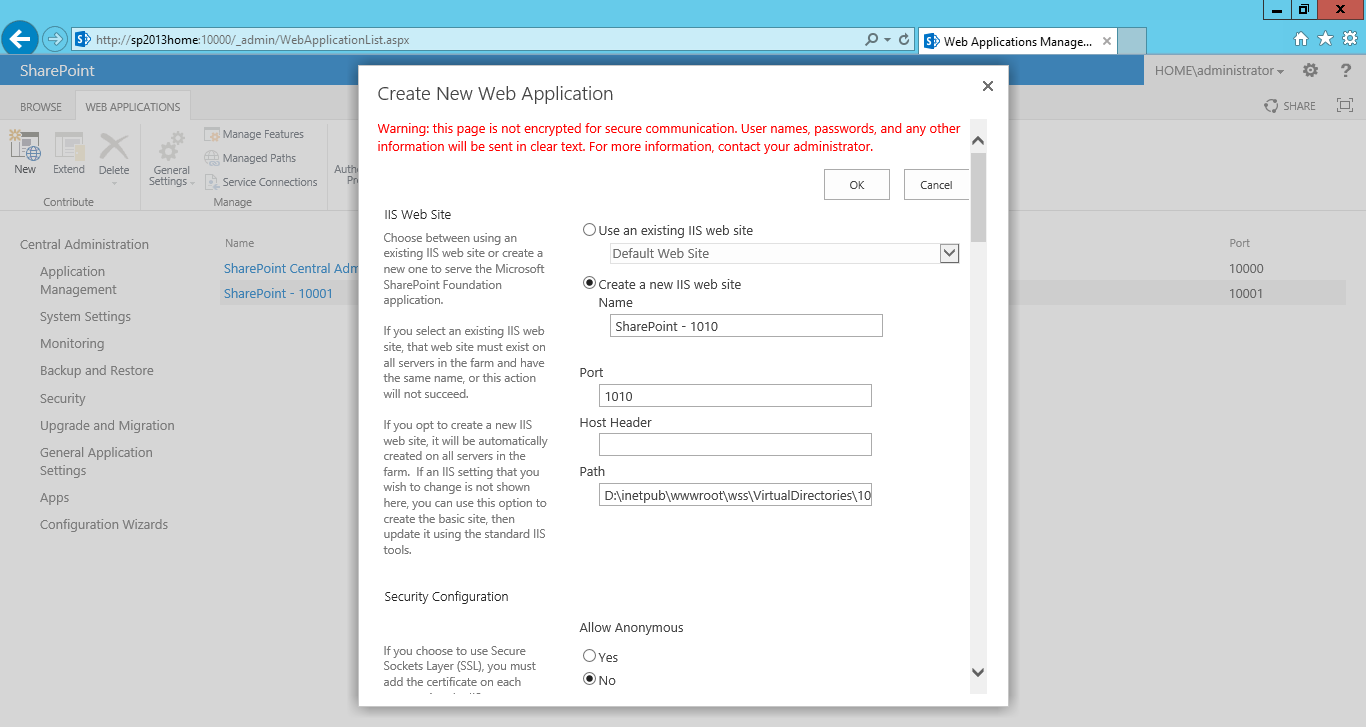
1) Create new Web Application
First we will need a new WebApplication which will contain the My Site host site collection as well as personal site collections for each user.
Go to Central Admin->Application Management->Manage Web Applications and create a new web application.
2) Create My Sites Host site collection
As a next step, we need a new site collection for hosting My Sites.
Click on Create site collection link.

Choose the My Site Host template for this site collection.

The My Site Host site collection will be created at the root.

3) Add new Managed path for Personal sites
Next we need a new managed path in the WebApplication, under which all the personal sites will be created.
Go to Central Admin->Application Management. Select the web application and click on Managed Paths link.

Add a new managed path named "personal".

The new managed path will created and appear in the list of managed paths.


Click on New button and select User Profile Service Application.

A wizard for creating the new service application will pop up. Provide the necessary details are shown in the following figure.

Provide the My Site Host site collection url and the managed path that we creates in the above steps.
 After entering all the necessary details, click on Create button. The new User Profile Service Application will be created.

Go back to Central Admin->Application Management->Manage service applications and select the newly create user profile service application.

Click on the Setup My Sites link.

Verify whether the My Site Host and Manged Path locations are correct.
Note: Optionally, you may enter a Preferred Search Center for searching users and documents.

7) Create My Sites
Once all the configurations are completed, we are ready to create personal site for users. Go to any SharePoint site in the farm and select About Me link as shown below:
 You will redirected to your own personal My Site home page which is in fact the home page of the My Site Host that we created in the above steps.

You can update your personal details like profile pic, contact information etc.
Note: Usually it takes some time (around 10 mins) for the personal site collection to be created. Once the site collection is created you will see the additional links (Newsfeed, Blog etc) in the left navigation bar.

Click on the Apps link and you be redirected to the site collection under the managed path "personal" and Username as the site collection name.

In central admin you will see that a new site collection for the particular user has been created in the WebApplication where we created the My Site Host.

Hope this post provides an idea about creating and configuring My Sites!
Steps for creating and configuring My Sites
1) Create new WebApplication
2) Create My Sites Host site collection
3) Add new Managed Path for personal sites
4) Enable Self-Service Site Creation
5) Configure User Profile Service Application
6) Setup My Sites
7) Create My Sites
Now lets see each of the steps in detail in order to successfully configure and use SharePoint 2013 My Sites.
1) Create new Web Application
First we will need a new WebApplication which will contain the My Site host site collection as well as personal site collections for each user.
Go to Central Admin->Application Management->Manage Web Applications and create a new web application.
2) Create My Sites Host site collection
As a next step, we need a new site collection for hosting My Sites.
Click on Create site collection link.
Choose the My Site Host template for this site collection.
The My Site Host site collection will be created at the root.
3) Add new Managed path for Personal sites
Next we need a new managed path in the WebApplication, under which all the personal sites will be created.
Go to Central Admin->Application Management. Select the web application and click on Managed Paths link.
The new managed path will created and appear in the list of managed paths.
4) Configure User Profile Service Application
A new User Profile Service Application will be needed for mapping the My Sites with the User Profiles. Before creating the service application, ensure that User Profile Service is running.
Go to Central Admin->Application Management->Manage service on server.
Make sure that the User Profile service (mandatory) and User Profile Synchronization Service (Optional) are in Started state.
Note: Though User Profile Synchronization Service is optional, it should be activated in order to synchronize SharePoint user profiles with the new users added in Active Directory.
Go to Central Admin->Application Management->Manage service applications.
Click on New button and select User Profile Service Application.
A wizard for creating the new service application will pop up. Provide the necessary details are shown in the following figure.
Provide the My Site Host site collection url and the managed path that we creates in the above steps.
Go back to Central Admin->Application Management->Manage service applications and select the newly create user profile service application.
Click on the Setup My Sites link.
Verify whether the My Site Host and Manged Path locations are correct.
Note: Optionally, you may enter a Preferred Search Center for searching users and documents.
7) Create My Sites
Once all the configurations are completed, we are ready to create personal site for users. Go to any SharePoint site in the farm and select About Me link as shown below:
You can update your personal details like profile pic, contact information etc.
Note: Usually it takes some time (around 10 mins) for the personal site collection to be created. Once the site collection is created you will see the additional links (Newsfeed, Blog etc) in the left navigation bar.
Click on the Apps link and you be redirected to the site collection under the managed path "personal" and Username as the site collection name.
In central admin you will see that a new site collection for the particular user has been created in the WebApplication where we created the My Site Host.
Hope this post provides an idea about creating and configuring My Sites!
No comments:
Post a Comment
Note: Only a member of this blog may post a comment.