In this post we will go through the steps required to create a provider-hosted app.
Overview
Provider hosted apps are Cloud-hosted apps that use a third-party provider for hosting the web application rather than Windows Azure websites. The third-party provider can manually provision Windows Azure or can be based on anything else, even an on-premises server farm of your own. In provider hosted apps the browser request is sent to the SharePoint server which in turn calls the .Net Application as a Separate Application.

Steps for creating a Provider-Hosted App
Now lets create a Provider-hosted app for a SharePoint 2013 Team site created on Office 365.
1) Open Visual Studio 2012 and select Apps->App for SharePoint 2013.

2) Enter the URL of the Site collection where you wish to deploy the app and select Provider Hosted option. Click Next button.

3) On the second page, the Visual Studio wizard for creating a provider-hosted app asks you to choose between using Windows Azure Access Control Services (ACS) for authentication and authorization, rather than using a high-trust configuration based on a private certificate and asymmetric keys exchange.
 The first choice is suitable when your app will be used on sites hosted on Office 365.
The second choice, High Trust, is suitable for on-premises scenarios.
4) You will notice that there are 2 projects (one for app and the other for web) created under the solution. Go to the Default.aspx and enter some sample text.

5) Right click on the app project and select publish.

6) The following window will pop up. Select New option and provide a name for the Profile. Click OK and then Next button.

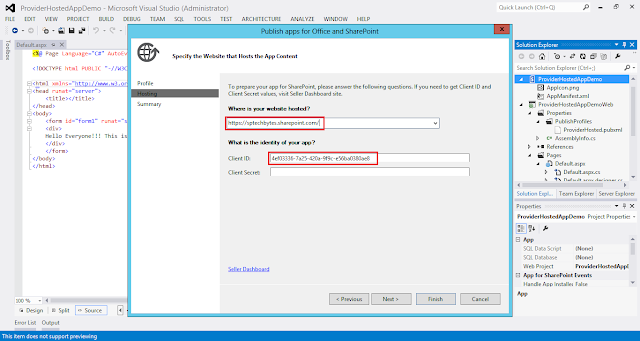
In the next page you will be asked to provide the url where the site is hosted, a Client ID and a Client Secret.
Client ID is nothing but a guid but you can't create it from visual studio. For creating the Client ID go to the AppRegNew.aspx page. The page will present inside the layouts folder. The URL would be something like https://MyServer/sites/MySiteCollection/_layouts/15/Appregnew.aspx.
 Go back to visual studio and copy the Client ID.
You will reach the final page of the wizard. Click Finish.

7) Once the app is published, the folder containing the .app file will open.

8) Now open the SharePoint site where you wish to deploy the app and click on the "new app to deploy" link.

9) The following popup will appear. Click on the upload link.
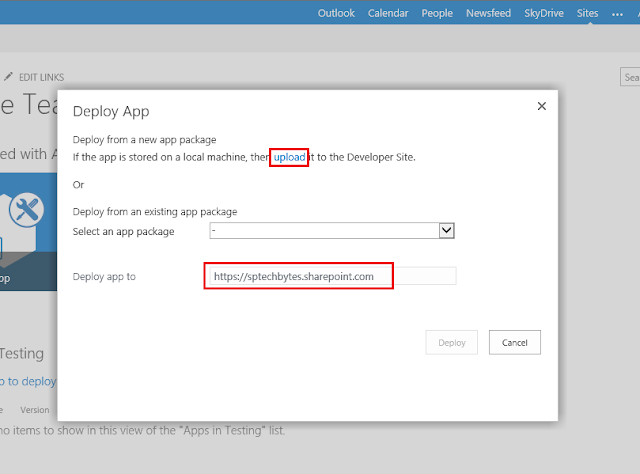
10) Enter the .app file location for uploading the app to the site.

11) Once the app is successfully installed, click on Deploy button to deploy the app.

12) The app will seek for permission to deploy. Click on Trust It button to give permission.

13) Once the app is successfully deployed, you can see it in the Site Contents page.

14) Click on the app and you will be navigated to the app page.

Overview
Provider hosted apps are Cloud-hosted apps that use a third-party provider for hosting the web application rather than Windows Azure websites. The third-party provider can manually provision Windows Azure or can be based on anything else, even an on-premises server farm of your own. In provider hosted apps the browser request is sent to the SharePoint server which in turn calls the .Net Application as a Separate Application.

Steps for creating a Provider-Hosted App
Now lets create a Provider-hosted app for a SharePoint 2013 Team site created on Office 365.
1) Open Visual Studio 2012 and select Apps->App for SharePoint 2013.

2) Enter the URL of the Site collection where you wish to deploy the app and select Provider Hosted option. Click Next button.

3) On the second page, the Visual Studio wizard for creating a provider-hosted app asks you to choose between using Windows Azure Access Control Services (ACS) for authentication and authorization, rather than using a high-trust configuration based on a private certificate and asymmetric keys exchange.

The second choice, High Trust, is suitable for on-premises scenarios.
4) You will notice that there are 2 projects (one for app and the other for web) created under the solution. Go to the Default.aspx and enter some sample text.

5) Right click on the app project and select publish.

6) The following window will pop up. Select New option and provide a name for the Profile. Click OK and then Next button.

In the next page you will be asked to provide the url where the site is hosted, a Client ID and a Client Secret.
Client ID is nothing but a guid but you can't create it from visual studio. For creating the Client ID go to the AppRegNew.aspx page. The page will present inside the layouts folder. The URL would be something like https://MyServer/sites/MySiteCollection/_layouts/15/Appregnew.aspx.


You will reach the final page of the wizard. Click Finish.

7) Once the app is published, the folder containing the .app file will open.

8) Now open the SharePoint site where you wish to deploy the app and click on the "new app to deploy" link.

9) The following popup will appear. Click on the upload link.


11) Once the app is successfully installed, click on Deploy button to deploy the app.

12) The app will seek for permission to deploy. Click on Trust It button to give permission.

13) Once the app is successfully deployed, you can see it in the Site Contents page.

14) Click on the app and you will be navigated to the app page.

Hi , im publishing app on remote server, im getting error page not found,
ReplyDeleteI guess i need to deply web application in addition to adding .app file,
Could you give me idea how to deploy it
I guess you are trying to deploy it on a SharePoint server. There are certain prerequisites, before deploying apps to a sharepoint server. You might want to have look at this url.
Deletehttp://sptechbytes.blogspot.in/2013/07/sharepoint-2013-creating-sharepoint.html
Let me know if you still have issues.
Can I deploy the above project on "on-promise" farm ? I.e Can I deploy a low trust app on local farm ?
ReplyDeleteI need to deploy a high-trust app and I need to deploy the WEB project to some remote server. Can you please let me know what extra steps do I need to perform?
ReplyDelete